| TkTreeCtrl |
TkTreeCtrl は、ttk::treeviewと同様、階層的なツリー表示が可能なリストボックスです。 複数のデータ項目を複数列に表示することができ、 少し書き込みが必要ですがセルのインライン編集も可能です。 特徴は、非常に多数の設定項目を持ち、さまざまな表示を実現できることです。 リファレンスマニュアルは こちら。 ここに並んでいるウィジェットコマンドを見ただけでもなかなかのすさまじさを垣間見れます。 最新バージョンは2.2.10です。 WindowsではActiveTclの配布に含まれているので、すぐに使うことができますが、 上記サイトから別途ソース配布、バイナリ配布をダウンロードすることもできます。 その中のdemosディレクトリにはさまざまなデモが含まれています。
このページでは、 今のところツリー表示の例はご紹介しませんが、 縦横二次元の表形式の表示、編集画面のサンプルを作ったので載せてみます。
このサンプルでも、過去に登場したあのデータをテキストファイルから読みます。 まず、マスターデータとして、 下のようなタブ区切り形式のテキストファイルを作り、 "shiten.txt" の名前で保存します。
00100 札幌 1 札幌市清田区美しが丘九条9丁目99 30 00200 仙台 2 仙台市青葉区柏木9-9-99 32 00301 新宿 3 東京都新宿区新宿九丁目99−99 50 ... (略) ... |
package require treectrl
package require fileutil
package require textutil

wm title . "Shiten"

# タブ区切りテキストファイルを読み、
# 中身を行、列2次元のリストに格納して返します。
proc readDataFile dataVar {
    upvar $dataVar data
    set content [::fileutil::cat "./shiten.txt" -encoding cp932]
    set rows [::textutil::split::splitx $content {[\r\n]+} ]
    set data {}
    foreach rowStr $rows {
        set rowArr [::textutil::split::splitx $rowStr "\\t+"]
        if {[llength $rowArr] != 0} { lappend data $rowArr }
    }
}

# treectrlウィジェットの作成
set f [frame .f]
set t [treectrl $f.t -font {Helvetica 12 normal} -width 400 -height 200 \
  -xscrollcommand "$f.x set" -yscrollcommand "$f.y set" ]
scrollbar $f.x -ori h -com "$t xview"
scrollbar $f.y -ori v -com "$t yview"
grid $t $f.y -sti news
grid    $f.x -sti news
grid rowconfig $f 0 -weight 1
grid columnconfig $f 0 -weight 1
pack $f

# 列の作成と見出し行の定義
set x 0
foreach e {支店コード 支店名称 地域 所在地 従業員数} {
    $t column create -text $e -expand yes -button no \
      -itembackground {#ffdddd #ddddff}
    if {$x == 2 || $x == 4} {
        $t column configure $x -itemjustify right
    }
    incr x
}

# データファイルの読み込み
readDataFile data

# Elementの作成
$t element create eText text -fill [list #800000 { selected focus }]

# Styleの作成
$t style create s1
$t style elements s1 eText
$t style layout s1 eText -padx {4 6} -expand ns -iexpand ns -sticky s

# 各データ行(item)の作成
foreach rowData $data {
    set rowId [$t item create]
    set col 0
    foreach cell $rowData {
        $t item style set $rowId $col s1
        $t item text $rowId $col [lindex $rowData $col]
        incr col
    }
    $t item lastchild root $rowId
}

bind . <Control-q> exit
|
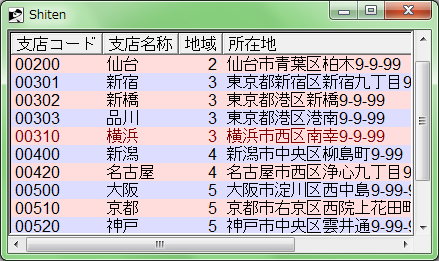
最も簡単な例でも早くも結構な行数になってしまいました。 TkTreeCtrlのウィジェットはtreectrlコマンドで作ります。 このコマンドのオプションは特別注意するところはないと思います。
$t column create -text $e -expand yes -button no \
  -itembackground {#ffdddd #ddddff}
if {$x == 2 || $x == 4} {
    $t column configure $x -itemjustify right
}
各列は1個ずつcolumn createウィジェットコマンドで作っていきます。
-textは見出しラベル、
-expandは列の境界を引っ張って列幅を変更可能にするかどうか、
-buttonは見出しラベルをクリックしたときボタンのように一旦へこむアニメーションをするかどうかを指定します。
面白いオプション1つ目は-itembackgroundで、
1つ以上の色のリストを指定すると、各行ごとに背景色が順番に割り当てられます。
最もよくあるのはこのサンプルのように2つの背景色を指定し、
交互に横縞模様にする指定ですが、
色を1つだけ指定することも、3つ以上指定することもできます。
また行の横縞模様ではなく、列の縦縞にすることもできます。
これはtreectrlコマンドの-backgroundmodeで指定できます。
次にデータ行を追加する前に、「Element」と「Style」を作る必要があります。 Elementが各セルを描画する上で必要な最低限の単位で、 これを1つ以上組み合わせてStyleを形成し、各セルに割り当てることで、 Styleに応じた方法で各セルが描画されます。
$t element create eText text -fill [list #800000 { selected focus }]
Elementにはbitmap、border、image、rect、text、windowの6種類があり、
それぞれに固有のオプションがあります。
この例では"eText"という名前のtext型のElementを定義しています。
-fillでは、このセルが選択状態、またはアクティブ(フォーカス取得)状態になったとき、
文字色を赤にする指定をしています。
$t style create s1
$t style elements s1 eText
$t style layout s1 eText -padx {4 6} -expand ns -iexpand ns -sticky s
"s1"という名前のStyleを定義し、それに"eText" Elementを紐付け、
さらにstyle layoutウィジェットコマンドでレイアウトの指定をしています。
何も指定しないと、各セル内の文字がセル境界ぎりぎりまで表示され、
文字がぎっしり詰まった印象を受けるので、
上のように-padxで少し間隔を空ける指定をするとよいでしょう。
set rowId [$t item create]
set col 0
foreach cell $rowData {
    $t item style set $rowId $col s1
    $t item text $rowId $col [lindex $rowData $col]
    incr col
}
$t item lastchild root $rowId
この部分が、1つのデータ行(item)を追加する処理になります。
まず、item createウィジェットコマンドで1行を追加します。
次に列の数だけitem style setでその行のその列、
つまりセルのStyleを指定し、
次にitem textまたはitem imageで表示する文字列や画像を指定します。
item style setはitem text等より先にしないとエラーになります。
最後にitem lastchildウィジェットコマンドで、
最初から存在する行識別子「root」の子として、
この行を追加することで描画対象になります。
lastchildは親の行IDに対する子という定義の仕方をしますが、
これ以外にfirstchild、nextsibling、prevsibling
というウィジェットコマンドもあります。
次に、セルをクリックしたらインラインで編集できるサンプルです。 Tclコードは以下の通りですが、編集を可能にするためのコード量がかなり多く、 一気に長いプログラムになってしまいます。 この編集処理部分はTcler's Wikiの TkTreeCtrl - edit text items in place - example をそのまま使わしていただきました。
package require treectrl
package require fileutil
package require textutil

wm title . "Shiten"

# タブ区切りテキストファイルを読み、
# 中身を行、列2次元のリストに格納して返します。
proc readDataFile dataVar {
    upvar $dataVar data
    set content [::fileutil::cat "./shiten.txt" -encoding cp932]
    set rows [::textutil::split::splitx $content {[\r\n]+} ]
    set data {}
    foreach rowStr $rows {
        set rowArr [::textutil::split::splitx $rowStr "\\t+"]
        if {[llength $rowArr] != 0} { lappend data $rowArr }
    }
}

# treectrlウィジェットの作成
set f [frame .f]
set t [treectrl $f.t -font {Helvetica 12 normal} -width 400 -height 200 \
  -xscrollcommand "$f.x set" -yscrollcommand "$f.y set" ]
scrollbar $f.x -ori h -com "$t xview"
scrollbar $f.y -ori v -com "$t yview"
grid $t $f.y -sti news
grid    $f.x -sti news
grid rowconfig $f 0 -weight 1
grid columnconfig $f 0 -weight 1
pack $f

# 列の作成と見出し行の定義
set x 0
foreach e {支店コード 支店名称 地域 所在地 従業員数} {
    $t column create -text $e -expand yes -button no \
      -itembackground {#ffdddd #ddddff}
    if {$x == 2 || $x == 4} {
        $t column configure $x -itemjustify right
    }
    incr x
}

# データファイルの読み込み
readDataFile data

# Elementの作成
$t element create eText text -fill [list #ffffff { selected focus }]
$t element create eSelectionRect rect \
    -fill [list #00008b { selected focus } #bfbfbf { selected !focus } ] \
    -showfocus no

# Styleの作成
$t style create s1
$t style elements s1 {eSelectionRect eText}
# ↑注:onButtonPress1内のelemNameは最後に指定したもの(この例ではeText)
#       が有効になるらしいので、必ずeTextを末尾にする。
$t style layout s1 eText \
  -padx {4 6} -expand ns -iexpand ns -sticky s
$t style layout s1 eSelectionRect \
  -union {eText} -padx {4 6} -expand ns -iexpand ns -sticky s

# 各データ行(item)の作成
foreach rowData $data {
    set rowId [$t item create]
    set col 0
    foreach cell $rowData {
        $t item style set $rowId $col s1
        $t item text $rowId $col [lindex $rowData $col]
        incr col
    }
    $t item lastchild root $rowId
}

# 編集イベントの定義
$t notify install <Edit-begin>
$t notify install <Edit-end>
$t notify install <Edit-accept>

$t notify bind $t <Edit-begin>  "cbEdit begin  %W %I %C %E %t"
$t notify bind $t <Edit-end>    "cbEdit end    %W %I %C %E %t"
$t notify bind $t <Edit-accept> "cbEdit accept %W %I %C %E %t"

bind $t <ButtonPress-1> "onButtonPress1 %W %x %y eText"
bind . <Control-q> exit

proc cbEdit {args} {
    foreach {callback tree item column elem t} $args {}
    if {$callback eq "accept"} {
        $tree item element configure $item $column $elem -text $t
    }
}

proc onButtonPress1 {tree x y targetElement} {
    set treeInfo [$tree identify $x $y]

    if {$treeInfo eq ""} {
        $tree selection cleartreeInfo
        return
    }

    if {[llength $treeInfo] != 6} {
        return
    }

    foreach {item itemNum column columnNum elem elemName} $treeInfo {}

    if {$item eq "item" && $column eq "column" && $elem eq "elem"} {
        if {$elemName eq $targetElement} {
            ::TreeCtrl::ButtonPress1 $tree $x $y
            update
            ::TreeCtrl::EntryOpen $tree $itemNum $columnNum $elemName
            return -code break
        }
    }
}
|
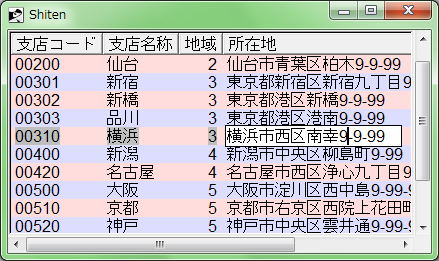
途中までは1つ目のサンプルと全く同じです。 違いが出てくるのはElementにeSelectionRectというrect型のものを追加しているところからです。
$t element create eText text -fill [list #ffffff { selected focus }]
$t element create eSelectionRect rect \
    -fill [list #00008b { selected focus } #bfbfbf { selected !focus } ] \
    -showfocus no
この例では、選択されておりフォーカス状態のセルは濃い青で、
選択されているがフォーカスはないセルは灰色で塗りつぶした長方形を描く指定をしています。
フォーカスがあるなしは、簡単には、
文字列が描かれたセルの、文字がある部分をクリックするとフォーカスありの選択状態、
文字数が少なくセルの右側が余っているとき、
そこをクリックするとフォーカスなしの選択状態になります。
またどちらの場合もeTextの-fillで文字色は黒から白に変わる指定をしています。
$t notify install <Edit-begin>この行以降が編集のための追加コードです。 notify installとnotify bindは、 Tkのbindコマンドと同様、ウィジェットにイベントをバインドする処理ですが、 Edit-beginなどTkTreeCtrl特有のイベントのバインドにこれらの専用コマンドを使います。
onButtonPress1が、あるセルがクリックされたときのコールバックプロシージャです。 クリックされたセルがeText Elementを持っていることを確認して、 ::TreeCtrl::EntryOpen で編集状態にします。
cbEditが、Edit-begin、Edit-end、Edit-acceptイベントのコールバックプロシージャで、 このうちEdit-acceptを受け取ったときに、編集後の値を item element configureウィジェットコマンドの-textでセルに設定しなおしています。


(first uploaded 2010/09/28 last updated 2010/09/28, MISUMI URANO)