| tixHListとウィジェットの埋め込み |
グリッド、ハイアラキカルリスト、タブリストボックスなどの各セルには、 「-itemtype text」で文字列を、「-itemtype image」で画像データ(アイコン) をセットするところまでは試しましたが、今度は第3の刺客 「-itemtype window」を使って、セルにボタンなどのウィジェットを埋め込む例です。
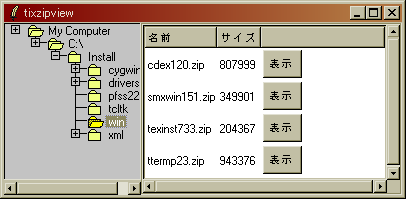
この例では、ハイアラキカルリストの3番目の列(column)に、 文字列や画像ではなく、ボタンを載せています。 どういう操作かというと、画面左のディレクトリツリー(tixDirTree) でディレクトリを移動させると、 そのディレクトリに含まれる.zipファイルの名前とサイズの一覧が右側のハイアラキカルリスト (tixHList)に表示されます。各行の「表示」ボタンを叩くと、 そのZipアーカイブの内容(格納されているファイルエントリの一覧) が別のウィンドウに出てくる、という、こういうわけなんです。 Zipアーカイブの展開には手前みそ拡張 DPUを使っています。
package require Tix
package require dpu

set trea [tixDirTree .trea \
  -browsecmd "CBDirTreeClicked .f2.ha" -directory C:/Install -showhidden 1]
set f [frame .f2 -rel groove -bd 2]
set ha [tixHList $f.ha -separator . -header 1 -columns 3 \
        -yscrollcommand "$f.scrv set" -xscrollcommand "$f.scrh set" \
        -width 40]
scrollbar $f.scrv -ori v -command "$f.ha yview"
scrollbar $f.scrh -ori h -command "$f.ha xview"
grid $f.ha -row 1 -col 1
grid $f.scrv -row 1 -col 2 -sticky ns
grid $f.scrh -row 2 -col 1 -sticky ew

$ha header create 0 -text 名前
$ha header create 1 -text サイズ

proc showZip {index zipFileName} {
    set g [toplevel .g$index]
    wm title $g $zipFileName
    set f [frame $g.fa -rel groove]
    set ha [tixHList $f.ha -separator / -header 1 -columns 7 \
        -yscrollcommand "$f.scrv set" -xscrollcommand "$f.scrh set" -width 60]
    scrollbar $f.scrv -ori v -command "$f.ha yview"
    scrollbar $f.scrh -ori h -command "$f.ha xview"
    grid $f.ha -row 1 -col 1
    grid $f.scrv -row 1 -col 2 -sticky ns
    grid $f.scrh -row 2 -col 1 -sticky ew

    $ha header create 0 -text エントリ名
    $ha header create 1 -text サイズ
    $ha header create 2 -text 圧縮サイズ
    $ha header create 3 -text 編集日時
    $ha header create 4 -text FLAG
    $ha header create 5 -text 内部属性
    $ha header create 6 -text 外部属性
    set i 0
    ziploop $zipFileName -arrayvar arr {
        $ha add $i -itemtype text -text $arr(name)
        $ha item create $i 1 -itemtype text -text $arr(size)
        $ha item create $i 2 -itemtype text -text $arr(compressed_size)
        $ha item create $i 3 -itemtype text -text \
          "[join $arr(date) -] [join $arr(time) :]"
        $ha item create $i 4 -itemtype text -text $arr(flag)
        $ha item create $i 5 -itemtype text -text $arr(iattr)
        $ha item create $i 6 -itemtype text -text $arr(eattr)
        incr i
    }

    button $g.b -text "閉じる" -command "destroy $g"
    pack $f -side top -padx 5
    pack $g.b -side right -padx 20 -pady 5
}

proc CBDirTreeClicked {ha dirpath} {
    set dirpath [lindex $dirpath 0]
    # 今の行を全て削除
    $ha delete all
    # エントリを追加
    set i 0
    foreach e [glob -nocomplain [file join $dirpath *]] {
       # 拡張子が.zipなら
       if {[file isfile $e] && "[file extension $e]" == ".zip"} {
           $ha add $i -itemtype text -text [file tail $e]
           $ha item create $i 1 -itemtype text -text [file size $e]
           set b [button $ha.b$i -text "表示" -command "showZip $i $e"]
           $ha item create $i 2 -itemtype window -window $b
        }
        incr i
    }
}

pack $trea $f -side left -fill y
# end.
|
ここでのボタンのように、-itemtype windowで指定するウィジェットは、 それを載せる親ウィジェットの tixHListの子となる名前をつける必要があります。 しかし注意点はそれだけ。簡単に、一見複雑そうな画面を作ることができました。


(first uploaded 2002/02/11 last updated (not ever), MISUMI URANO)