[incr Tk]超簡単ガイド
ガイドというか、3か月後の自分のためのガイドかもしれません。ということで!
[incr Tk]は、標準Tkで提供されるラベルやボタンなどのウィジェット(GUI部品) を組合せて、新しい複合ウィジェットを作るためのフレームワークです。 [incr Tk]で作ったウィジェットも、
- labelやentryなどのコマンドと同じ「コマンド ウィジェット名 ?オプション?」 という文法で使える
- 特に何も書かなくてもcgetサブコマンド、configureサブコマンドが使える
- 他のTkウィジェット(フレームやトップレベル)の上に載せられる
- packやplaceで配置できる
一番簡単な例として、 ここでは「LabeledEntry」という複合ウィジェットを作ってみます。 これは名前からは想像もつかないでしょうが、 なんと、エントリとラベルが一緒になったものです(ベタベタやん)。
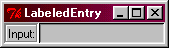
package require Itcl
package require Itk

itk::usual LabeledEntry {
    keep -background -foreground -font
}

class LabeledEntry {
    inherit itk::Widget

    constructor {args} {}
    destructor {}

    public method insert {args}
}

body LabeledEntry::constructor {args} {

    itk_component add lab {
        label $itk_interior.lab -rel groove -bd 3
    } { usual
        rename -font -labelfont labelFont Font
        rename -text -labeltext labelText Text
    }

    itk_component add ent {
	entry $itk_interior.ent
    } {
	usual
        keep -textvariable
    }

    eval itk_initialize $args

    pack $itk_interior.lab $itk_interior.ent \
	    -side left -fill y
}

LabeledEntry .le -textvariable Ope -labeltext Input:
pack .le
bind . <Key-Return> {
    tk_messageBox -message $Ope
}
# end.
●パッケージの宣言とクラス
[incr Tk]でクラス定義をするときには、冒頭部に
package require Itcl
package require Itk
と書けば[incr Tcl] [incr Tk]の機能が使えるようになります。 [incr Tk] では、 作りたい複合ウィジェットを1つのクラスとして定義します。 そのクラスは、必ず itk::Widgetを継承してください。
●コンストラクタ
そのクラスのコンストラクタで中に入る標準Tkウィジェットを作って載せていくわけですが、
先述のとおり、冒頭部で必ず
inherit itk::Widgetと書いてitk::Widgetを継承します。 この例では、複合ウィジェットLabeledEntryの上にはラベルとエントリの 2つのTkウィジェットが載ります。
●itk_component add コマンド
そのTkウィジェットですが、
itk_component addコマンドで作ります。
add の次の引数はここでの「lab」のように、
ウィジェットを個々に識別できる名前を適当につけます。
で、その次の引数で実際に「label」などのTkコマンドを使ってウィジェットを作るわけですが、
そのとき今作ろうとしている(ここではLabeledEntry)自身のウィジェット名は
$itk_interiorとして扱えます。
    itk_component add lab {
        label $itk_interior.lab -rel groove -bd 3
    } { usual
        rename -font -labelfont labelFont Font
        rename -text -labeltext labelText Text
    }
●keep
このクラスLabeledEntryの中に入るラベルとエントリは、そのままでは
クラスの外からconfigureでオプションを設定することができません。
そこで、外からこれら内部のウィジェットのオプションをcget&configure
できるようにするためのコマンドが、keep、
rename後から出てきますが
itk_option defineの3つのコマンドです。
そのうち、
keepコマンドは、指定したオプションを、
「親」ウィジェットでの指定をそのままこのウィジェットにも反映させるものです。
    itk_component add ent {
        entry $itk_interior.ent
    } {
        usual
        keep -textvariable
    }
この例で具体的にいうと、「keep -textvariable」
としているので、あとで出てきますがこのLabeledEntry
ウィジェットを作るとき、
LabeledEntry .a -textvariable hogerattaとすると、上の $itk_interior.ent が自動的に
entry $itk_interior.ent -textvariable hogerattaと指定されたのと同じ扱いになります。ちなみに
    itk_component add lst {
        listbox $itk_interior.lst
    } {
        usual
        keep -textvariable
    }
このようなことをするとエラーになります。
-textvariableはエントリにつくオプションで、
リストボックスにはつけられないからです。
●usual
で、いつもいつも指定するようなオプションは、
keepコマンドでいちいち指定するのではなく、
itk::usualコマンドの引数の中に一度だけ書いておく方法が便利です。
itk::usual LabeledEntry {
    keep -background -foreground -font
}
そうすれば、あとは毎回ひとことusualと書くだけでこれらのオプションが「keep」されます。
よく「keep」される代表的なオプションには
「-activeforeground」などがあります。
●rename
ところで、いつもkeepだけではうまくいかないこともあります。
例えばこのLabeledEntryは内部にラベルとエントリをもっているので、
ラベルのフォントとエントリのフォントを別々に
    LabeledEntry .a -labelfont {Helvetica 16 normal} \
                    -entryfont {Helvetica 12 normal}
こんな感じで指定させたいとします。しかし、標準Tkには -labelfont
などの名前のオプションはありません。そこで使うのがrenameコマンドで、
rename -font -labelfont labelFont Font
こうすると、
LabeledEntry .a -labelfont {Helvetica 16 normal}
というオプションでLabeledEntryを作ったとすると、
label $itk_interior.lab -font {Helvetica 16 normal}
このように指定されたかのように扱われます。どこがどう対応するか、
わかりますか?
ちなみにrenameコマンドの最後の2つの引数はそれぞれオプションのリソース名、
クラスと呼ばれるものですが、
私もあまりよく知らないので細かい説明はできないので、とばします。
…適当にそれっぽいのを指定してください(無責任)
普通は、リソース名はオプションの先頭の「-」を削ったものを使い、
必ず英小文字で始める必要があります。クラスのほうは、
なんかほんとうに適当でもいいのかという程度ですが、
必ず英大文字で始める必要があります。
ちなみに、標準Tkのどのオプションにも相当しない、 まったく新しい種類のオプションを作りたいという場合については、 残念ながらこのサンプルにネタがないので、後に回します。
●itk_initialize
…という今までのところで、
「LabeledEntry ウィジェット名 ?オプションども...?」
というときのオプションどもの指定についていくつか紹介してきましたが、
実際に指定されたこれらのオプションを解析し、
複合ウィジェットの内部ウィジェットに反映させる処理をするのが、
下の決まり文句です:
eval itk_initialize $args
毎回このとおり使いまわせばOKです。
●いざ使ってみよう
これまでにも既に何回か出てきていますが、
こうして作ったLabeledEntryを実際に使ってみます。
LabeledEntry .le -textvariable Ope -labeltext Input:
pack .le
LabeledEntryコマンドの使い方が、 標準Tkのウィジェットを作るコマンドとほぼ同じで、 しかも [incr Tcl]でいうクラスのインスタンス化をする処理でもある点に注目してください。 GUI部品のクラス定義という、他のOO言語と同じ考え方ですね。 上の .le が、Tkのウィジェット階層を反映した「ウィジェットの名前」 であるのと同時に、[incr Tcl]クラスの「インスタンス名」 を兼ねているわけです。 で、上のようにして作ったウィジェットも、通常のlabelやentry などと同様に、
set font [.le cget -labelfont]
.le configure -labeltext "入力:"
このようにcget&configureも使えるほか、
frame .fa
LabeledEntry .fa.le -textvariable Ope -labeltext Input:
このように他のフレームやトップレベルに載せることもできます。
連動するウィジェットをまとめよう
[incr Tk]を使うと特にありがたいのは、複数の互いに「連動する」 ウィジェットを組み合わせた複合ウィジェットをクラス定義しておくことで、 複合ウィジェットを構成するウィジェットの内部操作と「外界」 が入り混じってバグっぽくなるのを防ぐことができやすい点です。 連動するというとリストボックスとスクロールバーの連動が代表的ですが、 もちろんああいうのも[incr Tk]にうってつけの複合ウィジェットの例といえるでしょう。
ユーザーインターフェースの観点からポピュラーな連動の例が、 ラジオボタンとエントリの組合せです。 つまり、ラジオボタンがチェック状態になったときだけ、 エントリに入力可能になるという。 こんな例です。
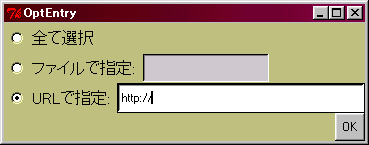
ユーザーを迷わせない、という基本にそって、 このラジオボタンとエントリを1組としてウィジェットにしたのが次のスクリプトです。
package require Itcl
package require Itk

itk::usual OptEntry {
    keep -foreground -background -font
}

class OptEntry {
    inherit itk::Widget

    constructor {args} {}
    destructor {}
    public method trace_proc
}

body OptEntry::constructor {args} {

    itk_component add rad {
        radiobutton $itk_interior.rad
    } { usual
        keep -variable -value
        rename -font -labelfont labelFont Font
        rename -text -labeltext labelText Text
    }

    itk_component add ent {
	entry $itk_interior.ent -state disabled
    } {
	usual
        keep -textvariable
        rename -width -entrywidth entryWidth Width
    }
    eval itk_initialize $args
    set varname [$this cget -variable]
    global $varname
    trace variable $varname w "$this trace_proc"
    pack $itk_interior.rad $itk_interior.ent \
	    -side left -fill y
}

body OptEntry::trace_proc {args} {
    set varname [$itk_component(rad) cget -variable]
    global $varname
    set value   [$itk_component(rad) cget -value]
    if {"[set $varname]" == "$value"} {
	$itk_component(ent) configure -state normal -bg white
        focus $itk_component(ent)
    } else {
	$itk_component(ent) configure -state disabled -bg gray80
    }
}

. configure -bg #c0c080
radiobutton .ra -variable Operation -value 0 -text {全て選択}  -bg #c0c080 \
  -font 8x16
OptEntry .oe1 -textvariable OpeFile -labeltext {ファイルで指定:} \
  -variable Operation -value 1 -background #c0c080 -entrywidth 20 \
  -labelfont 8x16
OptEntry .oe2 -textvariable OpeUrl -labeltext {URLで指定:} \
  -variable Operation -value 2 -background #c0c080 -entrywidth 40 \
  -labelfont 8x16
set OpeFile {}
button .cmda -text OK -command ok_clicked
pack .ra .oe1 .oe2 -side top -anchor w
pack .cmda -side top -anchor e
set Operation 0

proc ok_clicked {} {
    global Operation OpeFile OpeUrl
    switch $Operation {
      0 { tk_messageBox -message "ALL." }
      1 { tk_messageBox -message "FILE: $OpeFile" }
      2 { tk_messageBox -message "URL: $OpeUrl" }
    }
    exit
}
# end.
●itk_component変数
[incr Tk]のクラス内部で部品ウィジェットを参照するには、
$itk_interior.fa.labのようにTkパスで指定する方法のほかに、itk_component add コマンドで指定した部品ウィジェットの「識別名」を使って、
$itk_component(lab)このようにitk_component変数を使うこともできます。
複合ウィジェットの王道?スクロールバーつきリスト
先述の通り、複合ウィジェットの王道といえばこれ。 スクロールバーとリストボックスが一体になった Scrolledlist というウィジェットを下のように定義すれば、
Scrolledlist .sl -background "#c0c080" -height 6
pack .sl
こんな感じで簡単にスクロールバーつきリストが出せるようになります。
package require Itcl
package require Itk

itk::usual Scrolledlist {
    keep -background -foreground -font
}
class Scrolledlist {
    inherit itk::Widget

    constructor {args} {}
    destructor {}

    itk_option define -dccommand dccommand Text {}
    public method insert {args}
    public method curselection {}
    public method clear {}
    public method get {index}
    public method __doubleclicked {}
}
body Scrolledlist::constructor {args} {
    frame $itk_interior.fa -rel groove -bd 3

    itk_component add list {
	listbox $itk_interior.fa.lsta \
           -yscrollcommand "$itk_interior.fa.scrv set"
    } {
	usual; keep -selectmode -height -width
    }

    bind $itk_interior.fa.lsta  "$this __doubleclicked"

    scrollbar $itk_interior.fa.scrv -orient vertical \
	    -command "$itk_interior.fa.lsta yview"

    eval itk_initialize $args
    pack $itk_interior.fa.lsta $itk_interior.fa.scrv \
	    -side left -fill y
    pack $itk_interior.fa
}
body Scrolledlist::__doubleclicked {} {
    if {"$itk_option(-dccommand)" != ""} {
	eval $itk_option(-dccommand)
    }
}
body Scrolledlist::insert {args} {
    eval $itk_component(list) insert $args
}
body Scrolledlist::curselection {} {
    return [$itk_component(list) curselection]
}
body Scrolledlist::clear {} {
    $itk_component(list) delete 0 end
}
body Scrolledlist::get {index} {
    return [$itk_component(list) get $index]
}
## クラス定義はここまで
proc dc {} {
    set a [.sl get [.sl curselection]]
    tk_messageBox -message "$a is selected."
}
Scrolledlist .sl -background "#c0c080" \
  -dccommand "dc" -height 6
pack .sl
foreach a {1 2 3 4 5 6 7 8 9 10} {
    .sl insert end "item $a"
}
# end.
●あとで操作しないウィジェット
複合ウィジェットの中でもフレーム(frame)のように、
最初に作ったら「外界」から二度と操作する必要のないものは、
    itk_component add frame {
        frame $itk_interior.fa -rel groove -bd 3
    }
とわざわざ書かなくても、
frame $itk_interior.fa -rel groove -bd 3
で十分です。ただし、こう書いた子ウィジェットはコンストラクタ以外では「名無し」
として扱われるので、[incr Tk]クラスのコンポーネントとしては操作できません。
●独自のオプションを定義するには
先のkeepやrename
というコマンドは、
元来Tkウィジェットにあったオプションをそのまま流用するために使う便利なコマンドですが、
どのTkウィジェットにもない全く新しいオプションを定義したいときもあり、
このときにはitk_option define
コマンドを使います。
itk_option define -dccommand dccommand Text {}
ここでは Scrolledlist に「-dccommand」
という名前の新しいオプションをつけられるようにしています。
このようにして作ったオプションは、「-width」や「-font」などの
Tkでおなじみのオプションと全く同様に扱えます。
つまり、ウィジェットの作成時にオプションとして指定できたり、
cget & configure サブコマンドで使ったりできます。
Scrolledlist .sl -background "#c0c080" \
  -dccommand "dc" -height 6
せっかく作ったオプションは、自由に使って構いません。 この「-dccommand」オプションは、Tclコマンドを何か指定しておけば、 Scrolledlist内のリストボックスがダブルクリックされたときに、 そのコマンドが自動的に実行されます。 というか、クラスの設計者がそういうふうに書くわけですね。
body Scrolledlist::__doubleclicked {} {
    if {"$itk_option(-dccommand)" != ""} {
	eval $itk_option(-dccommand)
    }
}
このように、現在のオプションの値はインスタンス変数
$itk_option(-オプションの名前)で取得できます。
よくある例:ガイデッドリストボックス
こんな複合ウィジェットも結構ポピュラーなインターフェースですね。つまり、 リストやラジオボタンの項目をどれか選択すると、 その選択についての解説文が隣りに現れるという。ここではインストーラによくある、 「標準インストール」「最小インストール」「カスタムインストール」 の選択をさせるダイアログをモデルとして使ってみました。
package require Itcl
package require Itk

itk::usual GuidedListbox {
    keep -background -foreground -font
}

class GuidedListbox {
    inherit itk::Widget

    constructor {args} {}
    destructor {}

    itk_option define -direction direction Text {vertical}
    public method __selection_changed
    public method insert {index item message}
    public method curselection {}
    public method get {index}
    private variable __guidedmessage
}

body GuidedListbox::constructor {args} {

    itk_component add frame {
        frame $itk_interior.fa
    }
    itk_component add listbox {
        listbox $itk_interior.fa.lsta \
          -yscrollcommand "$itk_interior.fa.scrv set"
    } { usual; keep -selectmode
        rename -width  -listboxwidth  listboxWidth  Width
        rename -height -listboxheight listboxHeight Height
    }
    scrollbar $itk_interior.fa.scrv -orient vertical \
      -command "$itk_interior.fa.lsta yview"
    itk_component add message {
	message $itk_interior.msga
    } {
        rename -width  -messagewidth  messageWidth  Width
    }
    foreach e {lsta scrv} {
	pack $itk_interior.fa.$e -side left -fill y
    }
    foreach e {fa msga} {
	pack $itk_interior.$e -side top
    }
    bind $itk_component(listbox)  \
      "$this __selection_changed"
    eval itk_initialize $args
}

body GuidedListbox::__selection_changed {} {
    variable __guidemessage
    set item  [$itk_component(listbox) get \
      [$itk_component(listbox) curselection]]
    set msg $__guidemessage($item)
    if {"$msg" != ""} {
	$itk_component(message) configure -text $msg
    }
}

body GuidedListbox::insert {index item message} {
    variable __guidemessage
    $itk_component(listbox) insert $index $item
    set __guidemessage($item) $message
}

body GuidedListbox::curselection {} {
    return [$itk_component(listbox) curselection]
}

body GuidedListbox::get {index} {
    return [$itk_component(listbox) get $index]
}

configbody GuidedListbox::direction {
    switch $itk_option(-direction) {
	vertical {    set side top  }
        horizontal {  set side left }
    }
    foreach e {frame message} {
	pack forget $itk_component($e)
    }
    foreach e {frame message} {
	pack $itk_component($e) -side $side
    }
}

label .la -text {Pachimon Browser for Windows ver2.1 インストーラ}
GuidedListbox .gl -listboxheight 6 -messagewidth 100 \
  -direction horizontal
bind .  {
    .gl configure -direction horizontal -messagewidth 100
}
bind .  {
    .gl configure -direction vertical -messagewidth 250
}

.gl insert end フルセット \
  {インストール可能な全ソフトウェアをインストールします。}
.gl insert end 最小 \
  {使用に必要な最小限の構成でインストールします。}
.gl insert end カスタム \
  {モジュールごとに選択してソフトウェアをインストールします。}
button .cmda -text OK -command ok_clicked
. configure -width 300 -height 180
place .la -relx 0 -rely 0 -relw 1 -relh 0.2
place .gl -relx 0.05 -rely 0.2 -relw 0.9 -relh 0.7
place .cmda -relx 0.7 -rely 0.9 -relw 0.2 -relh 0.09
proc ok_clicked {} {
   set item [.gl get [.gl curselection]]
   tk_messageBox -message "selected: $item"
}
# end.
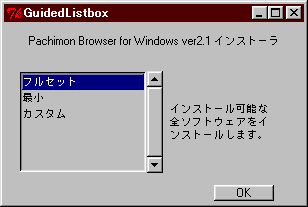
-direction horizontal
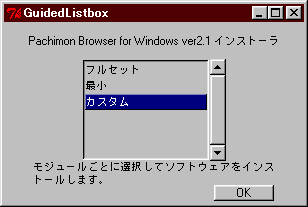
-direction vertical
今度のもitk_option defineを使っています。 今度は「-direction」という新しいオプションを作っていますが、 つまりメッセージをリストボックスの右に出す(horizontal)か、 下に出す(vertical)か、という指定をさせるわけですが、
itk_option define -direction direction Text {vertical}
この場合は前の Scrolledlist の -dccommand とときと違う種類の工夫が必要です。
つまり、
.gl configure -direction horizontal -messagewidth 100
のようにconfigureされた瞬間に何か処理をすることによって値の内容を実際に反映しないといけないわけで、
このためにはconfigbodyという専用のコマンドが用意されています。
configbody GuidedListbox::direction {
    switch $itk_option(-direction) {
	vertical {    set side top  }
        horizontal {  set side left }
    }
    foreach e {frame message} {
	pack forget $itk_component($e)
    }
    foreach e {frame message} {
	pack $itk_component($e) -side $side
    }
}
configbodyコマンドは、上のように
configbody クラス名::オプション名 {
    このオプションがconfigureされた直後に実行する処理
}
という書き方をします。
実行する処理の部分は、
通常の[incr Tcl]クラスのメソッドと同じ書き方をすることができ、
[incr Tk]特有のインスタンス変数 itk_component や itk_option
も使うことができます。


(first uploaded 2000/05/06 last updated (not ever), EK)